Flat, straight and square lumber is crucial to starting any woodworking project. Your board has two faces and two edges that must be square and parallel to one another. Four Square, or S4S is a milling term used to describe this. Milling wood inacurately creates problems that will compound themselves throughout a project. The procedure for accurately milling wood is always the same. When this sequence of six steps is followed on every board you will be off to a great start!
Step 1: Read The Grain!
I can not stress enough how important it is to read the grain direction on every board before every milling operation in your woodworking project. This first step is so important but often overlooked. This step alone will save you money and time by producing a much finer surface as well as saving you wear and tear on your machines and the dulling effect on planer and jointer knives.

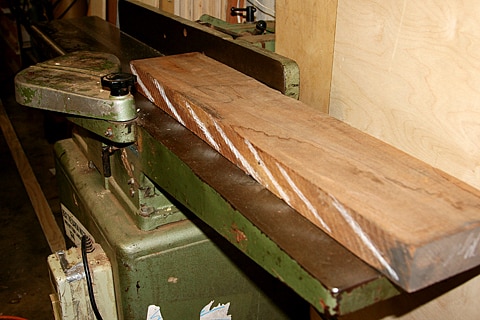
Step 2: Make one face flat on the jointer. (I like to join the crowned face first.)
Step 3: Make the opposite face straight and flat using the planer, to produce two parallel faces.
Step 4: Choose either edge to straighten on the jointer.
Step 5: Rip the remaining rough edge on the table saw to produce two parallel edges.
Step 6: Square the ends on the table saw.
These steps will guide you in the beginning stages of milling for your woodworking project. Watch the videos below. I perform all six steps of how to square wood and explain in detail how to achieve S4S lumber.
In summary, anyone can square lumber without reading the grain, but it will take much more work in the long run to create a quality product because you will have so much hand planing and sanding involved. Reading the grain and milling your stock accordingly is not just an arbitrary woodworking rule, it is guaranteed to save you time and money.
Thank you for your videos and all responses to questions in comments. Really admire your respect for wood and using scrap for your projects. Greetings!
Thank you Dominik. I really enjoy what I do and I like helping others when I can. Thanks again for the nice comment.
Hi Trip, My mistake. That granite is just a free drop from some counter installers. The sharpening series shows me making a plexiglass stone holder that is probably hard to see. Since then I have switched to 11Gauge steel since I sharpen so much I kept breaking the plexi. If you write at askwoodman@gmail.com I can send you pics and links of the new setup.
Alan,
Thanks for the speedy reply. I guess I wasn’t clear, I was wondering how you made the granite sharpening work area with the cut-outs for the stones. Any informantion on that available?
Regards,
Trip
Alan,
I stumbled on to your website via youtube while looking for finishing information. Your introduction to Waterlox is great. I am a long time amateur woodworker and am learning much from you. Watching the video on sharpening, I was admiring your sharpening station – table – and wondering if you have a video on how to make one. I am in the process of building my shop and need a good sharpening station. Any thoughts would be appreciated.
Regards,
Trip
That was my old table (which I still use) but so many people wrote about about I built a new one with some updated features and little more refined and made a detailed video series about every aspect of making it. Here is a link http://www.youtube.com/watch?v=eG0_pb_tXus&list=PL06ACC20F47E7FE39&index=1 Keep in touch. Allan
That was a great response!!! Thank you for you videos you have been a huge help on numerous projects!
Thanks Woodman for explaining reading the grain- nowhere in the few wood work books I have has this been covered so clearly as what you did in your videos. I am saving to buy a planer/jointer, in the mean time I couldn’t wait to make something so I hand planed some narrow offcut oak I found and made a mirror frame/picture frame – it turned out tiny because I made so many mistakes on the joinery, however, it was great to read the grain, and see the differences and realise how easy some things are, and how rewarding, once you get there. I also finished it following the techniques you advise on finishing, however, can’t find the products you use here in England, but found something similar. Anyway, I couldn’t thank you enough!
What about the virgin, ancient forests that are cut down for your to saw and shape?
What makes you think the wood I am using is from ancient virgin forests? The poplar is grown in river bottoms along the Mississippi and harvested sustainably. The lyptus is grown on farms. The birch for the plywood is grown in Russia and is made from rather small replanted trees. Maple trees are plentiful all along the east coast. These woods are not exotic and are certainly not old growth. The sipo is a fast growing West African species grown as a crop to give people livelihoods. So your implication that I am raping the Earth for my small business is offensive. Perhaps look around your own home and look at the disposable junk you buy from Ikea or Office Depot made from clear cut Indonesian pulp wood before you make insinuations.
Thank you for going through the sequence of squaring. It’s the best one I’ve seen because you explain the grain and SHOW how to read it and how it is supposed to be worked in relationship to the Jointer and Planer. You may get some comments on being “Long Winded” but for woodworkers like me who are somewhat “woodowork challenged” it is really a BIG HELP. Makes me want to go home and just practice.
Check out videos 41,42 in The Plywood Box Series for an even better explanation and demonstration of milling.
Do you have a method for milling lumber without a jointer? I do not have a jointer and honestly probably wouldn’t spend the money on one right now. It seems they are a 1 trick machine and the models I could afford don’t offer much more than 6″ wide capability. Even buying S2S or S4S from lumberyard does not guarantee me squared lumber…
Thanks!
One trick machines? But that one “trick” is the basis for milling lumber. A machine that straightens and flattens and squares lumber is pretty amazing. All my projects start on the jointer after the boards have been bucked to length. Honestly the only alternative would be to eat a hearty breakfast and get your hand planes and straight edges out and prepare to get a workout. I am not trying to be flippant, but the basic woodworking trifecta is the jointer, planer, table saw combination for prepping stock to work. The three machines are required to quickly get lumber ready to work. You can’t depend on s4s for accurate squareness and flatness, and you are overpaying for someone to have done a substandard milling job.
Hi John
If you pass a curved board through a planer, what comes out is a curved board of a uniform thickness. For some applications like flooring for example, the curve is straightened out after being fastened to a flat substrate i.e. subfloor. But for most applications in woodworking your stock needs to be not only a uniform thickness but straight also. A planer will not flatten or straighten but only makes a cut by referencing against what is against the bed of the planer. If your stock is straight then your method works well. If not, then a lot of design and fabrication decisions become more complicated.
I do not know where you are, but most larger cities have hardwood lumber yards where you can buy 4/4 #1 common poplar rgh. This means yellow or tulip poplar a full 1″ thick, in a variety of lengths and widths, that have not been planed at all and sold in what is called “in the rough”. Buying lumber like this is the way to go. It is sold in a standard thickness and then random widths and lengths. The grade is determined by the percentage of boards in a bundle of a certain length and width. FAS (Firsts and seconds) is the highest grade followed by #1 common. These two grades have equal quality wood, but what differentiates them is just dimension. i.e. longer wider boards in FAS. This is without a doubt the best wood for the beginning woodworker to start with. Cheap, works like a dream, can be stained to look like almost any wood. Takes a finish, dye, or paint fantastically. Hard enough to make furniture out of that will last. White poplar is even better, but because of Chinese demand, it is not as available or priced like it once was.
So if you start buying your lumber in this very cost effective way, you will also be starting with a board thick enough to joint a face perfectly flat before you thickness plane it. The result be will stacks of components for your project that really are s4s. I buy almost all my lumber in the rough so I have that extra thickness to face joint for absolute flatness. It just keeps problems from compounding themselves throughout a woodworking
project.
Regards,
Allan
P.S. Thanks for subscribing to my YouTube channel. I have lots of great content to come.
Dear Sir:
I am a beginning woodworker and wanted to thank you very much for your video(s).
I recently purchased both a jointer and a planer and have been practicing squaring pine (cheap 4″ wide, 3/4″ thick from Home Depot). I was wondering why not use the planer for both faces and do the jointer for one edge, table saw for other. As the planer has pressure keeping the board with the cutter head it seems this would be easier. Is this idea incorrect?
thanks again,
john ralph