Why not make your own guide rail for your table saw, band saw or router table?
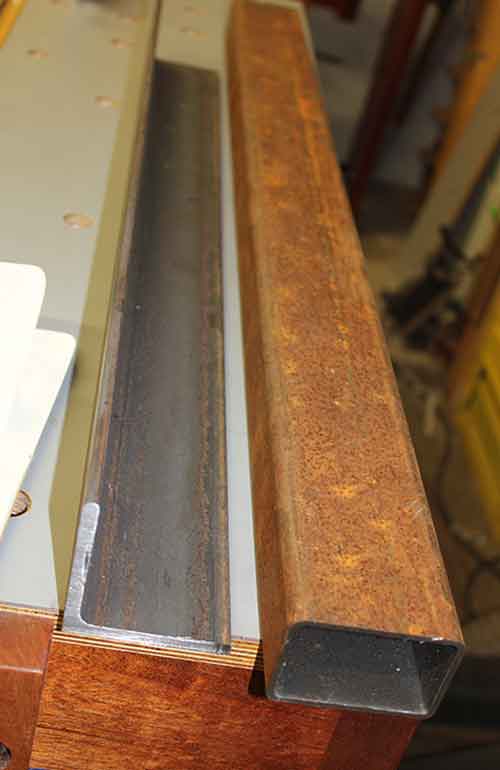
A guide rail is made up of two basic components: 1) a piece of angle iron 2) a piece of rectangular tubing
Making your own guide rails is composed of making two attachments: 1) attaching the tubing to the angle iron 2) attaching the angle iron to a table
A simplified overview for making your own guide rail system is composed of these seven steps: 1) buying the steel, 2) prepping the steel 3) making various holes in tubing and angle iron 4) attaching tubing to angle iron 5) attaching angle iron to table saw 6) disassembling for priming and painting 7) reattach guide rail for final placement on table saw
BUYING THE STEEL
You don’t need to be a welder to make your own guide rails, you just need to buy some steel. If you take your measurements before you buy your steel you can often get the pieces cut to the exact size you need at your steel supplier. If you have a way to transport and cut the steel, get full length pieces for a better price.
PREPPING THE STEEL
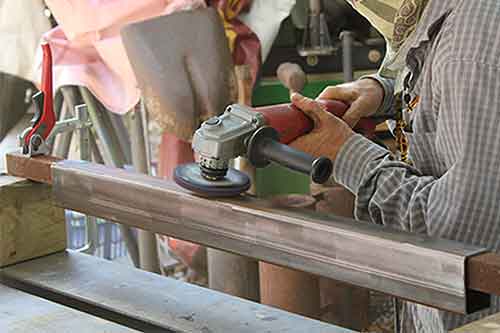
Steel is usually greasy and grimy and often has scale and/or rust when you buy it. There are two reasons you might want to clean your steel before you begin. 1) If you are going to paint your steel yourself, you’ll have to clean it before priming, so you might as well do it now. 2. If you want to your hands and everything you touch to be less grimy throughout your project.
• If you are going to pay to have your guide rail powder coated at the end of your build, and you don’t mind the extra grease and grime, don’t bother cleaning. The powder coaters will sandblast before they begin.
• If you are going to paint the steel yourself, the old school way to clean and prep steel is to use a knotted wire wheel and an angle grinder to knock off scale. This will work, but it’s time consuming and not easy. If you use the purple 3M Scotchbrite CX-DN deburring discs (4 1/2 in diameter), as seen in the photos and videos, they clean ten times faster than a knotted wheel. While they aren’t cheap, they are a great value. Not to mention that knotted wire wheels are much more dangerous and grabby. They buck the grinder and can jack up your wrists if you aren’t careful.
HOLE DRILLING TECHNIQUES

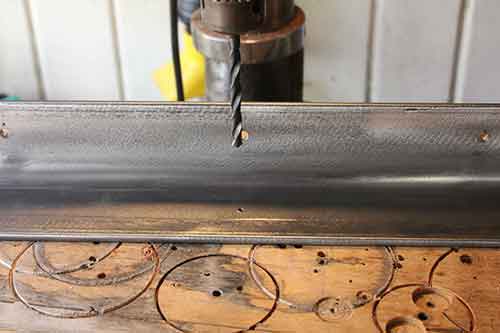
You’ll be using 3 operations for making the holes for your guide rail.
Drilling into the bottom (horizontal portion) of the angle iron that attaches to the tubing.
Drilling and tapping into the bottom of the tubing where it attaches to the angle iron
Drilling and countersinking into the side (vertical portion) of the angle iron where it attaches to the table saw. (If you don’t have a countersink, hex bolts will work just fine but you parallel spacing will have to be adjusted.)
How many holes you need to drill, tap and countersink depends on the length of your guide rail set up. Here is a tap drill chart for reference.
ATTACHING THE TUBING TO THE ANGLE IRON
Materials:
To attach the tubing to the angle iron I used 1/4″-20TPI, grade 8, cap head screws, 3/4″ long. NOTE: Hex bolts will work too.
Technique:
Drill and Tap holes using a 1/4” 20TPI tap
Hole spacing:
You first hole will be 1 inch in at both ends of the angle iron. And then equal spacing between those holes if possible with the spacing not to exceed 10 inches apart. If the spacing doesn’t add up nicely, add an extra bolt if you have to.
Positioning:
PARALLEL SPACING SET UP: To get the correct position of the tubing to the angle iron you will use a long bar or blocks for parallel spacers along the length, as well as some blocks to use as lifts to make sure you are up and away from the corner of the angle iron. The spacing you will need will depend on whether you countersink or use hex bolts. Either way you need to have a full 3/4” of clearance spanning the entire length of your tubing.

ATTACHING THE ANGLE IRON TO THE TABLE SAW
Materials:
To attach the angle iron to the saw I used 5/16″ countersunk, grade 8 bolts, 1 1/4″ long with washers, lock washers and nuts. NOTE: Hex bolts would work also, but you will need to adjust your parallel spacing.
Technique:
Make countersink holes in your angle iron to attach to your table saw and extension table. If you don’t have a countersink you can hex bolts just as easily.
Hole spacing:
Spacing is not a concern when attaching the angle iron to the table. The more important concern is finding solid connection points. Some tables may be so narrow that you can only have two bolts connecting and others may have up to four.
• There many different types of table saws. How your cast iron table was made (cast iron webbing configuration ) will determine how much access you have to drill and bolt.
Positioning:
STEP-DOWN SPACING SET UP: To get the correct position of the angle iron to the table you will need two flat, straight, milled boards (36″ – 48″ in length) four clamps and 2 small spacers. This will ensure that you get the exact step down measurements as required for all Biesemeyer style guide rails. Make sure the two small spacing blocks are exactly 13/16th in height so when you clamp in place your positioning will be perfect.

PRIMING AND PAINTING
Two options: Pay to have your guide rail powder coated or do it yourself using high quality primer and paint.
FINAL ATTACHMENT OF GUIDE RAIL TO TABLE SAW
After you clean out the paint from your holes you are ready for final attachment. All the work is done so installation is only 3 more steps.
1. Attach your angle iron to your saw securely, but still a little loose.
2. Attach your tubing to your angle iron, with your parallel spacing set up in place, tight! This is your final tightening of the tubing to angle iron.
3. Then use your step down spacing set up one last time and make the final micro adjustments to the angle iron placement. When you get it just right, do you final tightening of the angle iron to the table. You are done!
Hi Allan – Terrific inspiration, overview, and detailed guide for dramatically improving any precision cutting tool. You may not be aware, but the link behind your text “Here is a tap drill chart for reference” no longer resolves. Here’s a live link equivalent to your ncsu.edu link that correctly resolves (as of 2016.10.18): http://amasci.com/tesla/Tap_Drill_Chart.html
Additionally, if you were ever to consider hosting these charts on your site, the are also two internet archive versions at: http://web.archive.org/web/20160430015806/https://www.physics.ncsu.edu/pearl/Tap_Drill_Chart.html
http://archive.is/488hI
Thanks!
I was wondering why you used roller instead of shaker can. (spray can)? You have done a great job explaining everything. I am restoring my dads old saw (Craftsman) 130. series. I have purchased two additional wing extensions, and want to do the upgrade for the fence. Thanks for your video.
David
Hi David — I don’t think there is any comparison between the industrial red oxide primer and the alkyd enamel that I use (in both quality and durability) and the paint that comes out of the rattle can. Also, sprayed finishes are never as durable as rolled or brush finishes because the atomized paint particles are just laying delicately on the surface when you spray. When you roll or brush you are mechanically binding the paint to the surface. – Allan