Every new woodworking project for me requires milling lumber. Starting off with my planer and jointer knives at their sharpest always sets the right tone. After the design and drawings are done, performing the sequence of steps to bring my knives back to peak sharpness is really rewarding and fun. Watching pro football in my shop on a Sunday afternoon sharpening my tools for the week’s work ahead is really one of life’s simple pleasures for me.
When I first started woodworking professionally I was at the mercy of sharpening services. The money and the time without my knives was an irritation, but the lack of consistent results with no recourse drove me to find a self reliant alternative. I never hollow grind edges. I prefer a flat facet. The way I produce these single facets on planer knives, jointer knives, chisels and plane irons makes secondary bevels unnecessary.
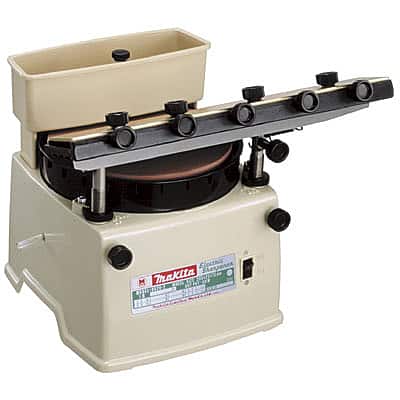
Minimal metal removal in minimal time, using machines and tools that are reasonably priced, very simple and reliable is a priority. These requirements are filled perfectly by the Makita 9820-2 Electric Blade Sharpener for planer/jointer knives, and DMT diamond stones and the General Sharpening Jig The Ultimate Sharpening Jig for chisels and plane irons. Could my tools be sharper? Of course. I could spend more time honing the edges and I have. But the extra time and effort does not seem to produce a substantially sharper or more durable edge. Is it sharper? Yes it is. Will the edges I will show you how to produce work the hardest woods with ease? Yes they will.
The lesson of sharpening tools is to not let unobtainable perfection be the enemy of good solid function that allows us to complete our cutting tasks.
I know from personal experience that less then optimally sharp tools wastes time and money. That’s why I made a series of woodworking videos how to sharpen knives. Watch my Blade Sharpening For Milling Lumber and Makita Blade Sharpener 9820-2 series to see everything I’ve learned over the years. This low tech machine is undoubtedly one of the most important tools I own.
EXAMPLE: On a huge job using long leaf pine I had to pull, sharpen and reinstall my knives four times in one day on several occasions. How would a sharpening service have helped me here? This machine helps you “get on with it”.
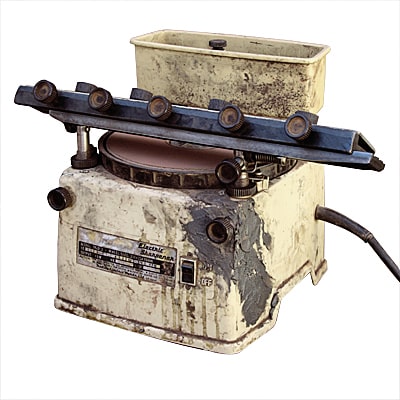
I have owned my Makita Blade Sharpener for over twenty years and I highly recommend purchasing one of your own. I don’t know what I’d do without mine.
Below are some of the tools I used in the videos above.
Makita Electric Blade Sharpener
DMT Diamond Stones
General Sharpening Jig (Replaced with The Ultimate Sharpening Jig as of May 2012)
Simple Green (as a cutting fluid, mixed 50/50 with water)
I need to know how to set the angle of the cut. You say to set the angle to 50 deg for planer and 45 for jointer. I know to turn the one adjustment screw for that but need to know the referace points for meserments.
I have had my Makita sharpener for 27 years and have only been able to sharpen one edge of my double sided blades because the” forward adjustment screws” press on the recently sharpened edge of the blade as I attempt to sharpen the second side of the knife.
Does anyone have a fix for this so I can sharpen BOTH edges of my planer blades ?
Hi Dennis I have never seen or heard of planer blades that had a double bevel. Perhaps you can send me a couple pics of the knives and the problem you are having and what type of machine they go in. It is a lot easier if you write me at askwoodman@gmail.com Look for forward to hearing from you. I am sure we can get this sorted out. Allan
have you used the makita sharpener on longer blades, 15in, torn between the makita or the tormek.
16″ is what it is designed for. But I have done longer than that with a blade shift. The difference between the two systems is flat or hollow ground edges. I don’t care for hollow ground edges on any tools except lathe tools sharpened on the bench grinder. I think they are a weaker less durable edge than a honed flat faceted edge. The two machines represent two very different sharpening philosophies. Discussions can often become as contentious as disagreements about religion or politics.
Just recently purchased a Makida sharpener and came across your website after reading the directions that came with the unit (and wanting to know more). Thank you so much for demonstrating what successful sharpening with the unit looks like (and sounds like). I also appreciate the tips on both safety and maintenance. I started with a pair of shedder/chipper knives and was able to do in a few minutes what it used to take me much-much longer using only a stone. No mysteries, no mistakes and no frustrations, all because of your well organized and detailed presentation. Thank you again.
Dave
Hi Dave, It is always gratifying when people find information of value in my videos. Thanks for watching and for taking the time to leave such a positive comment. That was on of my first video series and I was not quite as comfortable on camera as I am now. That is a really versatile machine but really takes the operator’s touch and feel to produce the desired result. Did you invest in a course stone also? Feel free to write me at my gmail address if there are any particular questions you have. I did a sharpening series for chisels and plane irons where I used the 9820 and course 120 wheel to reset bevel angles both freehand and with an accessory jig. It may be of interest to you now that you are in “The Club” :) Allan
Allan,
I’m glad that I ran across your site. I, too, have owned the Makita 9820 for at least 20 years, and I have to say that I use it very little because I just have not been able to get it to work. I’m hoping that with a few additional details from you, that can now change.
The problem that I have is that I just can’t get the jointer or planer blade to sharpen straight. I’m probably overthinking this, but the problem to me is that the geometry doesn’t make sense! But, obviously, you are making it work, so perhaps you can offer some insight.
First, I’ve reviewed the PDF at HWW, and I understand that you want the stone to eventually develop a slight slope along the radius on the right side so that you are sharpening along the entire right side, hopefully.
However the dilemma, at least to me, is how the blade should be supported by the tool rest. There are two choices. First, you can allow a small gap between the tool holder and the tool rest, in which case the blade is “supporting” itself, as is the case when one uses the typical sharpening jig on a stone, with, for example, a chisel. When I tried this, I found that it was impossible to get a straight grind if the knife is not perfectly straight. This is apparently because at first, the stone literally only sharpens at the outside edge, and as the blade gets to the edge, it falls off, causing some curvature, which is is then accentuated as you continue. I suppose that if the stone wears enough, it might be better, but while the stone is pretty new, the blade is making contact at only a small area, which allows it’s contour to follow the stone, and, if anything, causes the non-straightness to be accentuated.
Or, you can have the entire tool holder supported by the tool rest, which is what it appears that you do in your video. However, I found that when I do this, the sharpening doesn’t work, since you very quickly grind off the lowest spot at each point on the blade, at which point the sharpening stops since the blade is no longer in contact with the stone, and is instead being supported by the tool rest.
I’m hoping that I’ve explained this well enough and that you can offer some insights into to solve the problem. There is no question that the machine gets the blades very sharp, but I’ve just never been able to get a straight edge on either the 8″ jointer or the 15″ planer blade, and it seems to me that it’s because the geometry is a problem…
But, you’ve obviously solved it, so I hope you can help.
Thanks.
First let me apologize for not seeing your comment until today. I have had some hacking issues on my site and then of course all the password problems that go along with them, so your comment got lost in the website email noise. When I say “knife” I am talking about the planer/jointer blades.
I definitely subscribe to the full contact approach between the holder and the rest. I can almost always get my clean facet on the knife before I lose contact, but if not then a quick downward adjustment of the height posts gets things ready again. If the knife edge ever falls off the edge of the stone the holder is misaligned. I never let the knife travel into space unsupported by the stone when it is moving.
I think I know where your non straightness issues are coming from. Remember that even though the wheel is spinning at a constant rpm, the outside edge of the wheel is traveling much faster than the interior near the cup, therefore cutting faster. Even though the same rpm, higher feet per minute at the edge versus the interior. This is where you have to use your skill and finesse to make sure the knife is spending the equal amount of time
on each area of the stone across the length of the knife. Use a good stiff ruler to examine your edge as you experiment with the feed across the rest. I like to get a clean facet and general straightness and then take rapid light passes back and forth to float out straightness. Before I do this I give the inside of the rest/holder a good dose of light oil (Zoom Spout is my favorite) so the carrier glides without friction. When you correct your straightness issues on your knives it may take several setting adjustments before you get to the sweeping back and forth method. I am guessing you are high in the middle and lacking on the edges. This is from advancing, stopping, and returning the carrier across those ends more than in the middle. I try to keep the stone as flat as possible but just by the fact that it cuts faster on the outside it is always trying to fall off. I always think of the knives I am sharpening as truing tool for the stones while they are being sharpened.
That machine is a multi-layered burrito of subtlety and nuance. I was just forced to figure it out but it gave me headaches for a long time. Feel free to continue this discussion at askwoodman@gmail.com with me.
Again sorry for the lateness of my reply.
Allan
hi, i just found your website and am really enjoying it, so thank you for the effort you are giving it. i just purchased a makita 9820-2 at least in some part based on your recommendation (though i didnt realize i could have bought it through your website until it was too late, apologies. i’ve been messing around with it today and, after figuring out some of the little nuances of adjustment, i still have a couple of questions i thought you might be able to help with. the first is more a question of components: the stone that came with my sharpener seems to be off-centered; the nib and arbor hole are aligned, but the perimeter travels in an irregular path making both the initial blade approach and consistent pressure a little tricky. is this something that will become irrelevant as the stone wears or should i seek a replacement? secondly, and related to stone wear, im only making about an inch of contact on the right side of the stone, is the idea that as it wears the blade should be able to contact the entire right side? and, finally, could you give an idea of what the slurry/water mix should look like during grinding, i feel im probably using too much water, but i dont want to burn the blades. thanks again for all the help, and in advance for help here.
First off, you are not going to burn the blades. Like I said in the videos, when I first started I used way too much water and was usually soaked at the end of a sharpening session. I know in the videos there is a really good close up of the slurry. Those stones are a little wonky when you first get them. Just the action of sharpening will bring them into true. Just take it easy to start off and let the stones come into balance. Your stone contact will improve to the whole right side as the stone breaks in. You may write me at my gmail address if like. No worries about the click through, but if you shop at Amazon for anything if you click through my site I get a little money without changing the price to you. It is on anything Amazon has if you click through my site. Allan
Great videos! I just bought a used one and now I am ready to go . You saved us all alot of time with your knowledge. Thanks
Hi Bill I sent a link showing the only accessory jig that I am aware of. It is for sharpening straight plane blades and chisels. I do think that if you practiced a little more you could learn to sharpen your lathe knives on the 9820. I can put outrageously sharp edges on hatches and axes and hunting knives on that machine. But what I have found is that while free handing, you have to SEE the edge to stone interface. So I put the machine up high so I don’t have to stoop over and wear a flip down magnifying setup so I can make my hands control what my brain sees. I am 51 and need vision aids for close work. But it is amazing how the hands respond to the correct visual input. Let me know if this helps and what your results are. Allan
http://www.highlandwoodworking.com/makita9820-2usersguide.aspx
I have one of those Makita sharpeners and would really like to use it to sharpen my lathe tools but free hand isn’t working is there any jigs…..
Thank you, Bill
Hi Rick, Thanks for visiting the site.
The 9820 is just what your school needs for self sufficiency. The machine is designed for sharpening up to 16″ knives without adjustment. But in your situation, where the choice is a little extra care shifting the blade in the carrier, or waiting with no blades. The choice is obvious. Once you get the feel of the machine, you will be shocked at how little material you actually have to remove to have perfectly sharp edges. Because of the isolated area of your school, I would probably invest in the course green wheel as well. You don’t use it often, but it makes such quick work of removing nicks from knives it will be seem like a small investment. The stone that comes with the machine is more for resetting a clean facet versus removing damaged edges. Plus the green wheel is just the ticket for reshaping axe and hatchet blades as well as quickly regrinding an edge on knives and machetes.
Soon I will have videos of my chisel and plane iron sharpening techniques. These will be very helpful to you and your students. I have developed a simple and foolproof low tech repeatable method for anyone to put a razor sharp durable edge on their woodworking tool. The technique is also very safe even for young, less coordinated student woodworkers. If you subscribe to askwoodman.tv you will be notified when new videos are posted. Please write with any other questions. And if you do buy this machine perhaps you can click through my Amazon store to do so? http://askwoodman.wpengine.com/shop/
I am a missionary in Jos, Nigeria. Part of my work is teaching shop at a Christian School (Hillcrest School). We have a one year old 15″ grizzly planer and 8″ grizzly jointer in the student shop and a 20″ planer (very old but with brand new donated blades) and a 12″ jointer (presently not being used but told it runs) in the maintenance shop. This Mikita system looks like a good solution to the problem of trying to get our blades resharpened. Often we send them back to the US to a good shop as sharpening services here are very hit and miss.
Would the Makita system be able to be used to sharpen the 20″ planer blades; could they be repositioned and still get a consistent edge on the entire blade? This looks like a good option for the school and I am assuming it also could be used for chisels, hand plane blades, etc.
Any comment you could pass along would be helpful. I am not a “trained” Industrial Arts teacher. My main duties are as head of the clinical laboratory at our local mission hospital. But I had done a lot of woodworking in school and kept at the hobby and so when the former shop teacher retired here I was asked to step in. Have been teaching one HS and ons MS class now for the past 5 years.
I think I have learned a lot more than the kids!
Thanks for your comments
Thanks for the comment Will. Getting highly damaged edges back in working order quickly without damaging the temper of your steel is another area where this machine shines. I actually have a whole video series in the editing stage that features the chisel and plane iron sharpening technique I use. I show how to use either a small belt sander or the Makita 9820 to quickly remove edge damage and get a clean facet ready for honing. On the 9820 I always remove damage with the course green wheel because it is just so fast. In my videos I use a jig I bought over twenty years that is specifically made as an accessory to that machine. I think http://www.HighlandWoodworking.com still sells this although I could not find an exact link to send you. They have a instructional pdf for this machine where they discuss and show the jig. I’ll email you the pdf I downloaded from their site here: http://www.highlandwoodworking.com/makitasharpenerpackagespecial.aspx.
If you subscribe to my website and/or my youtube channel you’ll be notified when those chisel sharpening videos are uploaded.
Thanks for the great series. This was some of the best advertising for this machine Makita could ask for. I have some HUGE chip out of my Jap plane iron, and I’m tempted to use this machine for helping with that as hand sharpening would take a year and it would be sloppy. The stone ring is about 1/4″ wider than the iron and I could make a jig for the blade to slide on the rail, although I’d likely only be sliding it that 1/4″. And if that goes well, what about chisels? If you sharpen a few random chisels *and then* the jointer/planer blades, the stone should self level, right? Basically, if you are proficient in hand sharpening couldn’t you use this as a tool rest and sharpen other stuff? I prefer “facets” also. For flattening you could just “sharpen” a random steel bar or something. Looking forward to your chisel vids.
Hi Brian,
How were the results sharpening your jointer knives? The 9820 is a fine machine. Remember not to over tighten the knobs in the plastic housing. After twenty plus years of use, other than the wheel wearing away, the cracked housing on my machine is all that is wrong with it. And that is from me being a gorilla when it comes to tightening things. No offense to gorillas.
Could you please send me a photo of you wearing your version of the plastic bag smock to post on the site?
Thanks for the comment Richard. I am using the 1000 grit stone that comes standard with the 9820. My results have always been so good that I never invested in the 6000 grit wheel. I would like to hear from someone who uses one about their results to see what I am missing. As I mentioned in the video, I do own the course green stone that I use on badly damage knives. I don’t use it very often, but it makes quick work of chipped edges.
Glad you found the videos helpful. I also have some videos on sharpening chisels, plane irons and scrapers you might enjoy that I hope to post next month. Thanks again.
i bought the same makita sharpener awhile ago ,and wasn,t sure how too set it up,so thanks for the tips .in the morning iam going out to my garage ,and will sharpen my jointer knives,cant wait .and i will put on the garbage bag smock. great site keep it up.
What grit stone do you use? It comes with a 1000 grit. Did you use a 6000 grit for these videos?
thanks so much for info… lots of good info
Thanks Adan. You will get so much use out of it for your
work.
Very informative video Allan. Can’t wait to get a wetstone sharpener of my very own.
Hey Melissa!
Thanks for commenting, and of course you know that we’re on a first name basis. You don’t have to call me Mr. Woodman,… although it does have a nice ring to it. ;)
@CherylFinfrock Glad you liked the garbage bag attire. More to come!
Great site Allen! Although it’s hard to believe I just spent half an hour watching someone work in a garbage bag, the videos were clear w/ lots of good information. Now I have a new machine to covet–that looks like a good one.
For many years I had my knives sharpened by a sharpening service, which usually meant I would go way too long with dull knives before dealing with it. When I finally started doing it myself (using wet sandpaper on a granite block with a holding jig), it was one of those rare “oh my god” moments when I put them into use. Now I find the sharpening is a pleasant chore–you could almost say foreplay before the satisfaction of using a finely honed machine.
So what’s the next lesson? Can’t wait.
Thanks for leaving a comment Jerome. There are two more 10 minute videos to come that talk about reinstalling planer joiner knives and then using them to dimensionalize a board. Then I have several videos awaiting editing on sharpening chisels, plane irons and scrapers that I think you might like. Hope to have them up soon. I am also looking forward to interviewing you about some of your techniques. Your work is amazing!
I like how the information is broken down. The garbage bag uniform is nice too, form and function.
Allan! or should I address you as Mr. Woodman;D
Your site looks so great. I can’t wait to show Jerome. He’ll actually knows what you are talking about. HA! You and Sue are on a roll! No stopping you now!
All my best,
Melissa